


חופשת הקיץ מאפשרת בילוי משותף עם הילדים במטבח. זהו זמן נפלא לקירוב לבבות ולשיחות נפש עם הילדים. ולא תאמינו, זה עובד אפילו עם מתבגרים.
זה הזמן לפתוח בבית ביחד גלידריה ביתית, והכנו ארטיקים וגלידות. לא אלו הפשוטים שהיינו מכינים כשהיינו ילדים, אז הסתפקנו במזיגת מיץ לכוסות, מיקום הכפית בכוס והופ, למקפיא.
בגלידריה הביתית נכין ארטיקים ממיצים בטעמים מגוונים, בתוספות פירות ותיבולים מיוחדים המקנים טעם וטקסטורה לארטיקים. אפשר להכינם גם על בסיס יוגורט, פרי וחלב, ולצפות אותם בגלימת פרי מרוסק, או להכין ארטיק על בסיס פירות מרוסקים, עם מעט סירופ סוכר ותבלינים שונים.
לעוד טעמים מעניינים וסרטוני הדרכה קצרים אני מזמינה אותכם לבקר ולעקוב אחרי גם בדף האינסטגרם והפייסבוק שלי. הכנתם? אל תשכחו לשתולתייג אותי באינסטגרם שלי אני סקרנית לראות את התוצרים שלכם
For the English recipe scroll down
טיפסקל
אפשר להשתמש בפירות טריים או קפואים. אם אתם משתמשים בפירות טריים, בחרו את הבשלים ביותר.
אפשר להשתמש בכל פרי שאוהבים. רק הקפידו על שילובי הטעמים.
שימו לב לדרגת המתיקות של הפירות. טעמו את המסה אחרי ההכנה ותקנו את המתיקות. אפשר להשתמש בתחליפי סוכר כמו דבש, מייפל, סירופ אורז ואגבה.
על מנת לקבל מרקם חלק ואחיד, טוחנים את הפירות בבלנדר. אפשר להשאיר חלק מהפרי בדרגת גריסה שונה, כדי לקבל מרקם מעניין בעת הנגיסה.
יש להניח את מקל הארטיק בתבניות לפני שמכניסים את הבלילה. יוצא מהכלל: ארטיק בכוסות. הקפיאו תחילה את הבלילה בכוס ורק אחרי שעתיים הוסיפו את המקלות. כך הם יהיו יציבים ולא ייטו הצידה.
לא חייבים לקנות תבניות ייעודיות לארטיקים. אפשר להשתמש בכוסות רגילות או חד פעמיות, תבניות של קרחונים, מכלים ריקים של מעדנים, תבניות סיליקון להכנת מאפינס, ועוד.
חשוב להותיר מעט רווח בין מסת הארטיק לשולי התבנית או כלי ההקפאה כי המסה מתפשטת בהקפאה.

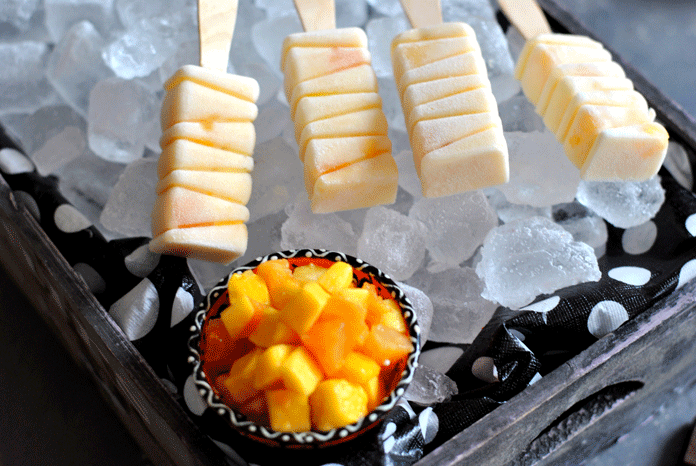
ארטיק מנגו משובץ בפרי
החומרים: (לכ-8 יחידות, תלוי בסוג הכלי)
1 כוס מנגו (מ-2 מנגו בינוני)
2 כוסות יוגורט
1 כף סילאן
1 כף סירופ אורז מלא בתוספת נקטר אגבה ומייפל
מעט וניל או זנגביל
לעיטור:
1 כוס מנגו, חתוך לקוביות קטנות

אופן ההכנה:
מניחים במעבד מזון את המנגו, יוגורט, סילאן, סירופ אורז והווניל. מערבלים עד לקבלת מרקם אחיד וחלק.
מניחים את מקלות הארטיקים בתבנית, יוצקים את הבלילה ומעטרים בקוביות הפרי. מקישים קלות את התבנית על משטח העבודה להוצאת בועות אוויר. מקפיאים לכ-5 שעות.
דרגת קושי: קל
זמן הכנה: 20 דקות + זמן ההקפאה
סוג המנה: פרווה (חלבי בשימוש עם יוגורט, שמנת, שוקולד)
סטיילינג וצילומים: פסקל פרץ-רובין
Styling and photo credit: Pascale Perez-Rubin
Fun homemade popsicles
What could be better in the summer than coming home after a long hot day and enjoying a refreshingly cool homemade popsicle.
Every year when summer vacation rolls around, parents look for exciting crafts and activities to do with their children or grandchildren that are fun and will help pass the time. Making homemade popsicles is a great activity to do with children, and you can’t imagine how happy they will be to eat the popsicles they made themselves. So, now that summer vacation is winding down, and despite the fact that some kids will be starting the new school year remotely by computer, instead of letting them sit all day in front of the TV or lounge on the couch with their nose in their phones, entice them into the kitchen with the promise of making and then enjoying these special cool summer treats. These recipes are a great alternative to buying mass-made popsicles at the corner store.
I find that even though they may put up a bit of resistance at first, many kids will finally begrudgingly agree to come into the kitchen to see what all the fuss is about. In the end, making food and treats together in the kitchen usually turns out being a great way for siblings and friends to spend time with each other. And don’t tell my kids I told you this, but I find that this also works with teenagers.
These aren’t the simple popsicles we made when we were kids, where we just poured a bit of syrup into a cup of water, stirred and put it in the freezer. These popsicles are made with all different flavor syrups, real fruit, candied nuts and of course they can be covered with chocolate and fun toppings. Some of the popsicles are made with yoghurt and come out nice and creamy.
TiPascale
It’s best to use seasonal fruit that are extremely ripe. You can use fresh or frozen fruit. You can blend the fruits completely, or you can blend them partially so that small pieces of fruit remain. You can put the popsicle sticks in place before or after you pour in the mixture, but make sure they’re in place before you place the popsicle mold in the freezer.
If you don’t have a popsicle mold, you can use plastic cups, ice cube trays, disposable cups, muffin pans or leftover yoghurt containers instead. Just remember that when liquid freezes, it expands, so make sure not to fill the spaces all the way to the top.
If you're using cups, you might want to let the popsicles freeze for two hours and then insert the popsicle sticks so that they won’t fall to the side. Then put the popsicles back in the freezer for a few more hours so they can freeze completely.
You can use any type of fruit you want, but try to combine fruit, syrup and toppings whose flavors go well together.
If you're using fruit that is not so sweet, you might want to add a little more honey, maple syrup, sugar substitute or rice syrup.
When you're making yoghurt popsicles, you can add fun toppings, such as gummy bears, marshmallows, white chocolate balls, cornflakes mixed with chocolate, nuts or any other topping you might enjoy. You can also play around with a variety of different chocolates – bittersweet, milk or white chocolate.

Ingredients
- 1 cup mango (about 2 mangos) or any other fruit you desire
- 2 cups yoghurt
- 1 tbsp silan
- 1 tbsp brown rice syrup mixed with agave and maple syrup
- A little vanilla extract or ginger
- Serving suggestion:
- 1 cup mango pieces
Instructions
- Add the mango, yoghurt, silan, rice syrup and vanilla to a blender. Blend until smooth. Pour mixture into a popsicle mold. Add the popsicle sticks and mango pieces. Bang the tray gently on the counter to remove any air bubbles and then put in the freezer for 5 hours.

הרשמו לניוזלטר של פסקל
הרשמו לרשימת התפוצה של פסקל לקבלת ניוזלטר חודשי מתוק


